Configuring DNS In CentOS
DNS Server In CentOS
Creating your own local domain name in Centos 9
To create a local domain name, we need to add a new zone entry inside the /etc/named.conf. open the file by running “vim /etc/named.conf” and scroll to the bottom of the document. Just above the include lines, insert your own domain name. The domain I was creating was “sweshi.org”.

Start by writing “zone” then the name of the domain in quotes as seen in the figure. Make sure to open and close the curly brackets and to include a semi-colon at the end of the closing bracket. In between the curly brackets you can include the line “type master;” to make sure that it is a primary authoritative server and then include the line with “file ‘sweshi.org’;” make sure that the domain name is in quotes. This will be the zone file that will have the IP address settings.
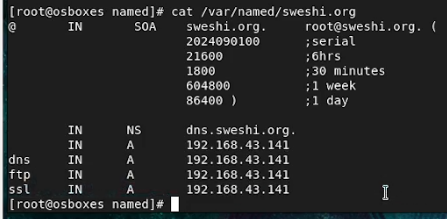
Go to the /var/named directory using “cd /var/named” command. Create a new file for the zone. In this case I created “sweshi.org” using “vim sweshi.org”. add the lines as shown in the figure. Where “sweshi.org” shows up, make sure to match it with your own domain name as set in the “/etc/named.conf”. Make sure that the syntax is correct with the full stops where necessary. The IP address can also be changed to your own machine’s IP. This is also true for the sub domains that are added. You can create your own subdomains by adding or changing the ones I included i.e., dns, ftp and ssl. If this is done well, you can start the service by running “service named start” and checking if it is running by using the command “service named status”.